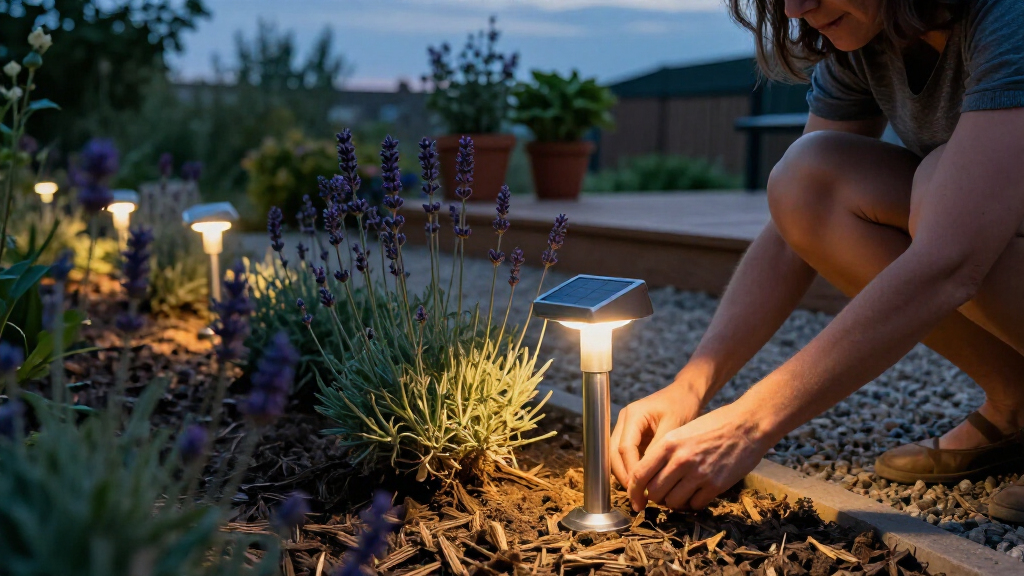

This guide walks you through installing solar garden lights along a path, around a patio, or across a planting bed so they charge during the day and switch on automatically each night. You will choose the right fixtures, map out placement, position each light for maximum sunlight, and test the system. The guide also covers the initial charge, common placement mistakes, and fixes for lights that fail to come on.

Get garden gear delivered free — and shop member deals
- Fast, free delivery on millions of items
- Access to Prime Big Deal Days deals on October 6–7
- Prime Video, Amazon Music and more included

DenicMic Solar Pathway Lights Outdoor, 10 Pack
- ✔ Quantity: 10 pack
- ✔ Light Color: Cool White
- ✔ Battery: 1.2V 250mAh Ni-CD AAA (user-replaceable)

GIGALUMI Outdoor Waterproof Solar Garden Lights, 12 Pack
- ✔ Quantity: 12 lights
- ✔ Material: Stainless steel
- ✔ Light Source: LED

2-Pack Dragonfly Solar Garden Decor Lights
- ✔ Quantity: 2 pack
- ✔ Light Source: LED (warm light)
- ✔ Power Source: Solar
This is a beginner-level task that requires no wiring, no electrical knowledge, and no special skills. Most installations take one to two hours for a set of 8-12 lights, plus one or two days of initial charging before the lights perform at full brightness. It is written for homeowners and renters using stake-style or mounted solar lights bought from a hardware store or online retailer.
Difficulty: Beginner | Time: 1-2 hours
What You’ll Need
Tools & Materials:
- Solar garden light set (path lights, spotlights, or string lights)
- Rubber mallet or small hammer (for firm soil)
- Screwdriver (some fixtures require one for battery access)
- Measuring tape or garden hose (for spacing layout)
- Soft cloth or damp paper towels (for cleaning panels)
- Optional: small spade for rocky soil
Knowledge:
- None required — if you can push a stake into soil and read a product label, you can do this
Check the contents of your light set before starting. Most sets include the fixture body, ground stake, and sometimes a separate top that twists on. Confirm batteries are pre-installed or included; some cheaper sets ship with a plastic tab you must pull out to activate the battery. Also note your region’s expected sunlight: lights need 6-8 hours of direct sun for a full charge. If your yard is heavily shaded, plan to buy lights with separate solar panels or fewer, brighter fixtures.
DenicMic Solar Pathway Lights Outdoor, 10 Pack
Of the three sets we compared, the DenicMic 10-pack earns our top spot because it makes the fewest compromises. Its IP65 waterproof, dustproof, and rustproof construction is a full tier above the IP44 ratings on both competitors — a meaningful difference if your garden faces driving rain, frost, or heavy snow rather than the occasional shower. The stainless steel pole and acrylic lamp head also feel built to last seasons, not months.The standout design choice is the diamond-effect acrylic head, which scatters light into a starburst pattern on the ground. Compared with the GIGALUMI’s plain 3-lumen glow, this makes each fixture feel like a small landscape feature rather than a dim marker. Runtime is also class-leading here: 10–12 hours on a 6–8 hour charge versus 8 hours for both other picks, which matters in winter when the sun sets at 4 p.m. and the lights need to carry the evening.Crucially, these are the only lights in this lineup with user-replaceable batteries. Solar fixtures usually die not because the LEDs fail but because the sealed battery degrades after a season or two — the GIGALUMI, with its non-removable fixtures, is effectively disposable once that happens. With the DenicMic, a fresh set of AAA cells revives the whole set.The honest tradeoffs: the included Ni-CD batteries are the weakest link — less durable than the NiMH cell in the dragonfly set and prone to capacity loss if not fully discharged. And like every decorative solar stake here, these won’t light a path you actually walk on after dark; plan them for ambience and gentle wayfinding, not safety.
Pros:
- IP65 waterproof, dustproof, and rustproof — the best weather sealing in this lineup
- User-replaceable AAA batteries extend the set’s usable lifespan well beyond sealed competitors
- Decorative diamond-effect starburst pattern adds visual interest the plain competitors lack
- Tool-free, wire-free installation in minutes
Cons:
- Ni-CD batteries are less durable than lithium or NiMH alternatives and degrade faster
- Decorative light output — not bright enough to serve as primary pathway illumination
Best for: Homeowners who want durable, serviceable pathway ambience that survives multiple seasons without rewiring or replacing the whole set.
Not ideal for: Anyone expecting bright, functional illumination for navigating steps or dark walkways after dark.
Bottom line: The most balanced and longest-lived pick here: best-in-class weatherproofing, replaceable batteries, and a light pattern that earns its place in the garden.
“The most balanced and longest-lived pick here: best-in-class weatherproofing, replaceable batteries, and a light pattern that earns its place in the garden.”
GIGALUMI Outdoor Waterproof Solar Garden Lights, 12 Pack
If your priority is stretching lights across the longest possible stretch of path, the GIGALUMI 12-pack is the obvious pick — two more fixtures than the DenicMic for lining driveways, garden beds, or a long front walk. The integrated stainless steel heads with transparent shades have a clean, traditional look that suits most landscaping without calling attention to themselves, and the cold white 6500K glow reads crisp rather than yellowed.But coverage is where the advantages end. At roughly 3 lumens per light, each fixture produces less usable light than the DenicMic’s starburst heads — fine for marking a path’s shape at dusk, inadequate for actually reading the ground beneath your feet. The IP44 rating also trails the DenicMic’s IP65: it handles rain, snow, and sleet in principle, but it’s less confident protection against driving rain and hose spray, so placement under eaves or sheltered beds is wiser.The bigger long-term issue is serviceability. The fixtures are non-removable, so when the internal batteries fade — typically within one to three seasons — there’s no revival path. The DenicMic’s replaceable AAA cells make that set the better five-year investment; the GIGALUMI is better understood as a shorter-term, lower-commitment way to fill a large space.Where it does shine is simplicity: connect the pole, push the stake in, and the dusk-to-dawn automation handles everything from there. Compared with the dragonfly lights, which need careful hanging spots, these are the most foolproof install of the three.
Pros:
- 12 lights provide the widest coverage per set in this lineup
- Automatic dusk-to-dawn operation with no switches to manage
- Simple tool-free stake installation — the easiest setup of the three
- Weather-resistant stainless steel construction for rain, snow, and frost
Cons:
- Very low brightness (~3 lumens per light) — decorative only
- Non-removable fixtures mean the set is effectively disposable once batteries degrade
- IP44 rating offers weaker weather protection than the top pick’s IP65
Best for: Buyers who want to line a long path, driveway, or large garden bed on a budget and accept a shorter service life.
Not ideal for: Anyone who wants bright walkway lighting or expects the set to last many seasons — the sealed, low-output fixtures won’t deliver either.
Bottom line: The coverage-per-dollar winner for big spaces, but a short-lived one — treat it as an easy, budget-friendly fill rather than a decade-long fixture.
“The coverage-per-dollar winner for big spaces, but a short-lived one — treat it as an easy, budget-friendly fill rather than a decade-long fixture.”
2-Pack Dragonfly Solar Garden Decor Lights
The dragonfly set plays a completely different game from the two pathway packs. These aren’t lights you line a walkway with — they’re hanging garden ornaments that happen to glow, with bouncy springs that make the metal dragonflies flutter and sway in the breeze. Where the DenicMic and GIGALUMI create rhythm along the ground, this pair creates a focal point in a tree, on a railing, or above a flower bed. That motion effect is genuinely unlike anything else in this comparison.The light itself is a warm fairy-light glow, which reads cozier and more whimsical than either competitor’s cool-white output — a better match for a seating area or porch than the crisper pathway aesthetic. Its single included NiMH battery is actually a better cell chemistry than the DenicMic’s Ni-CD, holding charge more reliably over its rated year of life. But with only two fixtures per set, illuminating a garden this way would be expensive; this is an accent, not a system.The weaknesses are real. It demands about 6 hours of direct sunlight for a full charge, so shaded porches or tree-heavy yards will shorten the evening runtime. And the 45-day warranty is the shortest here by a wide margin — reasonable confidence in the product would look like a full-year guarantee, so inspect the set promptly on arrival.Compared with the GIGALUMI, it’s more charming and better built as an object; compared with the DenicMic, it’s less practical. Neither comparison is really the point — it’s the pick for gift-giving and personality, and it fills that role well.
Pros:
- Bouncy springs create lifelike fluttering motion no stake light can match
- Warm LED glow suits patios and seating areas better than cold-white pathway lights
- NiMH battery chemistry is more reliable than the top pick’s Ni-CD cells
- Easy to hang on trees, railings, or hooks; a strong gifting choice
Cons:
- Requires around 6 hours of direct sunlight — shaded placement shortens runtime
- Very short 45-day warranty compared with typical garden-light guarantees
- Only 2 fixtures per set; impractical for coverage
Best for: Gardeners and gift-buyers who want a playful, warm-glow accent for trees, railings, or hooks rather than ground-level path lighting.
Not ideal for: Anyone lighting a path, driveway, or large area — two decorative fixtures can’t do that job, and shaded yards will limit its runtime.
Bottom line: A delightful accent rather than a lighting solution — buy it for charm and motion, not for illumination.
“A delightful accent rather than a lighting solution — buy it for charm and motion, not for illumination.”
As an Amazon Associate we earn from qualifying purchases.
Before You Start
Do two things before opening the boxes. First, observe your yard over a full day, or at least from morning to late afternoon, and note which areas receive direct sun for six hours or more. Trees, fences, and the house itself cast shadows that move during the day, and a spot that looks sunny at noon may sit in shade by 3 p.m. Second, decide what you want the lights to do: mark a walking path, highlight a plant or statue, or add ambient glow to a seating area. Path lights and accent lights solve different problems, and mixing them without a plan is the most common reason installations disappoint.
Also check the weather forecast. Install on a dry day, and expect the first night or two to produce dim or uneven light while the batteries complete their initial charge cycle. This is normal and not a defect.
Step-by-Step Instructions
Step 1: Pull battery tabs and switch the lights on
Unbox each light and inspect it. Look for a small plastic tab protruding from the battery compartment or switch housing and pull it out completely — this tab blocks the battery connection during shipping. Locate the power switch, usually a small button or slide switch on the underside of the solar panel or inside the battery cover, and set it to ON. If the fixture has a mode button (high/low brightness or steady/flashing), set it to your preferred mode now.
Tip:If there is no visible switch, the light may activate automatically when the sensor detects darkness. Cover the solar panel with your hand — if the light turns on within a few seconds, no switch is needed and the fixture is live.
Check: Cover each light’s solar panel with your hand or a cloth. The LED should light up within 5-10 seconds. Uncover it and the light should turn off again within a minute. Test every fixture indoors before carrying them outside — it is far easier to exchange a dead unit before it is in the ground.
Step 2: Charge the lights in full sun before installation
Place all lights, panels facing up, in a spot that receives direct sunlight — a patio table, driveway, or deck railing works well. Leave them there for a full day, ideally 8 hours, before installing them. The batteries in new solar lights often ship partially discharged, and the first full charge sets the baseline for runtime.
Tip:Do this step the day before you plan to install. Installing first and charging second means your first night will be dim or dark, which leads many people to wrongly assume defective lights.
Check: After a full day in the sun, the lights come on at dusk at visibly similar brightness. One noticeably dim unit may have a faulty battery — note it and handle it during installation.
Step 3: Lay out the lighting plan on the ground
Walk your intended lighting area and place each light, unmounted, exactly where you plan to install it. For path lights, space them 6 to 8 feet apart on alternating sides of the walkway, or 4 to 6 feet apart on one side for a brighter, more continuous line. For accent or spot lights, position them 1 to 3 feet from the object you are highlighting, aimed back toward it. Step back and view the layout from the angles you use most — the front curb, the back door, the patio seat.
Tip:Use a garden hose or rope to trace the line before placing lights. It is easier to curve a hose than to unstick eight stakes from hard soil. Adjust the layout while it costs nothing.
Check: You can walk the path at a casual pace and see the next light clearly from each fixture’s position. From your main viewing spot, the spacing looks even with no large dark gaps.
Step 4: Check each location for sunlight and obstacles
At each planned location, confirm the spot gets direct sun for at least 6 hours and that the ground is firm enough to hold a stake. Move any location that sits under dense shrub canopy, behind a fence line, or in the shadow of your house for most of the day. If a shaded area genuinely needs light, plan to buy a fixture with a remote solar panel on a cable, which lets you place the panel in sun and the light in shade.
Tip:Also look up and around: sprinkler heads, irrigation lines, and buried utility markers are often exactly where you want to push a stake. Call 811 in the US before digging if any location requires more than a shallow push into the soil.
Check: Every final location is free of overhead shade during peak sun hours, clear of buried hazards, and within reach for occasional cleaning and battery changes.
Step 5: Install the stakes and mount the lights
Attach the ground stake to each light fixture if it ships separately — most twist or push together. Hold the stake upright and push it into the soil with firm, even pressure until the top of the stake sits flush with or slightly above the ground. In hard or dry soil, water the spot briefly to soften it, or tap the stake in gently with a rubber mallet. In rocky soil, use a small spade to clear the rocks first. Once the stake is set, slide or twist the light head onto it until it locks.
Tip:Never hammer directly on the light fixture or the solar panel — strike only the stake, and only with a rubber mallet. Cracked panels from over-forceful installation are the most common self-inflicted damage in solar light setups.
Check: Each light stands vertical without leaning, does not wobble when nudged, and sits at a consistent height. A row of lights at matching heights reads as intentional; a leaning, uneven row reads as haphazard.
Step 6: Aim the solar panels and adjust the fixtures
Tilt or rotate each light so the solar panel faces the sky with the clearest exposure — in the Northern Hemisphere, that generally means facing south or southwest with no tilt obstruction. For spotlights, adjust the lamp head to aim at your target object while keeping the panel angled upward. Tighten any adjustment screws just enough to hold position; overtightening cracks plastic housings.
Check: Viewed from a distance, all panels have a clear view of the open sky, and each spotlight beam lands on the object you intended, not beside it or in a viewer’s eyes.
Step 7: Test the full installation at dusk
Wait for darkness and walk the entire installation. Confirm each light has come on automatically, check for uneven brightness, and note any glare that hits eye level from walking paths or seating areas. Reposition or slightly rotate any fixture that throws glare into a walking line. Note any light that stayed off.
Tip:Dusk-sensing lights activate in stages as light fades. Give the installation 30 minutes after sunset before judging brightness — some models switch on fully only when quite dark.
Check: Every light is on, brightness is reasonably uniform, no fixture blinds anyone walking the path, and the overall scene matches your layout plan from step 3.
Step 8: Clean the panels and set a maintenance routine
Wipe each solar panel with a damp cloth to remove dust, pollen, and installation fingerprints. Make a habit of wiping panels monthly during growing season, checking for leaves or snow in autumn and winter, and replacing rechargeable batteries every 1-2 years when runtimes shorten.
Check: Panels are visibly clean and glossy. Over the following weeks, the lights consistently run through the night or for their rated duration (typically 6-10 hours).
Common Mistakes to Avoid
- Installing lights in shaded spots and blaming the product —
Track sun exposure across a full day before placing lights. If an area is shaded, use a fixture with a remote panel on a cable, or relocate the light. Solar lights fail from lack of charge far more often than from defects.
- Spacing lights too far apart, creating dark gaps —
Keep path lights 6-8 feet apart maximum, closer for a continuous line. Do the ground layout in step 3 before any stake touches soil.
- Hammering the fixture instead of the stake —
Only tap the bare stake with a rubber mallet, and soften hard soil with water first. The panel and lens are the most fragile parts of the entire fixture.
- Judging the lights on night one before the batteries have had a full charge —
Charge all lights in direct sun for a full day before installation, and expect peak performance after two or three charge cycles.
Troubleshooting
Problem: A light does not turn on at dusk
Solution:
Cover the panel fully with your hand for 10 seconds. If it lights, the sensor works and the location may simply be too dim at that hour — wait for full darkness. If it stays dark, check the switch is ON, pull and reseat the battery, and confirm the battery tab was removed. If the battery has been in use over a year, replace it with a matching rechargeable AA or AAA NiMH cell (check the manual).
Problem: Lights come on but run for only 1-2 hours
Solution:
This is almost always a charging problem, not a battery failure. Clean the panel, confirm the location gets 6+ hours of direct sun, and trim any branches that have grown over the fixtures since installation. If the problem persists after a few sunny days, replace the rechargeable batteries.
Problem: One light is much dimmer than its neighbors
Solution:
Compare its panel cleanliness and sun exposure to the others first. Then swap its battery with one from a bright unit — if the dimness follows the battery, replace the battery; if it stays with the fixture, the LED or sensor is failing and the unit should be replaced.
Problem: Lights flicker or turn on during the day
Solution:
A daytime-on light usually means the sensor is shaded by leaves, dirt, or an overhang and thinks it is dusk. Clean the sensor (the small dark dot near the panel) and clear the obstruction. Flickering often indicates a loose battery contact — open the compartment and bend the contact tab slightly tighter.
What Success Looks Like
Your installation is complete when every light comes on automatically at dusk without any manual switching, stays lit through your intended hours (check once around midnight on the first clear night), and holds a steady, even brightness across the set. The stakes are firm, the fixtures level, the panels clean and sun-exposed, and no light throws glare into walking paths or seating areas. Walk the route once after dark: you should move comfortably and confidently along the path with each next light visible well before you reach it.
Next Steps
Recheck the installation after one week and again after the first heavy rain — soil can settle and leave lights leaning, and one firm push on each stake usually corrects it. Add a monthly reminder to wipe panels, and mark your calendar for battery replacement at the 18-month mark. If you want to expand, add accent spotlights for trees or architectural features one section at a time, repeating the sun-mapping step for each new area. For hard-wired low-voltage lighting in addition to solar — useful for long, shaded paths or winter reliability at northern latitudes — consult an electrician or a dedicated low-voltage lighting guide.
Frequently Asked Questions
How long do solar garden lights stay on each night?
Most quality path lights run 6-10 hours on a full charge, which covers dusk to early morning. Runtimes shorten in winter when days are short and panels receive weaker sun. Cheaper fixtures may run only 4-6 hours.
Do solar garden lights work in winter or on cloudy days?
Yes, but dimmer and for shorter periods. Panels charge on overcast days at roughly 20-50% of their sunny-day rate. In winter, position panels to catch the low southern sun and keep them clear of snow.
Can I replace the batteries in solar lights?
Usually yes. Most fixtures use standard rechargeable AA or AAA NiMH or NiCd batteries accessible behind a twist-off or screwed cover. Replace every 1-2 years when runtimes drop. Match the battery type and capacity listed in the manual.
How many solar path lights do I need?
For a typical front walkway of 20-30 feet, 4 to 6 lights spaced 6-8 feet apart are enough. For a brighter continuous line, use 6 to 8 lights spaced 4-5 feet apart on one side. Buy one extra light to keep as a spare for battery swaps and accidental damage.
Fall yard work Picks
leaf blowers
As an affiliate, we earn on qualifying purchases.