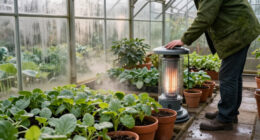


Use this guide to select and set up a greenhouse space heater, then check that it can hold the temperature your plants need. It is for greenhouse owners who can measure their growing space and follow appliance and electrical safety instructions. Allow 2-4 hours for measuring, placement, setup, and an initial operating check; heating performance may take longer to assess during cold weather.

Get garden gear delivered free with Prime
- Fast, free delivery on millions of items
- Prime Video, Amazon Music and more included
- Member-only deals all year

Greenhouse Heater with Thermostat, Auto Power Control with Digital Temperature Display, Fast Heating, Overheat Protection, Electr…
- ✔ Heat output: 1500W
- ✔ Amperage: 15A
- ✔ Thermostat: Electronic, with digital display and automatic on/off

Greenhouse Heater, 1500W Electric Space Heater with Thermostat, Fan & High Heat Modes, 25° Adjustable Angle, IPX4 & Overheat Prot…
- ✔ Power output: 1500W
- ✔ Voltage: 120V
- ✔ Amperage: 12.5A

VEVOR Greenhouse Heater, 1500W Electric PTC Space Heater with Fan, Low & High Heat Modes, Adjustable Angle, Overheat Protection,…
- ✔ Power output: 1500W
- ✔ Voltage: 120V
- ✔ Listed amperage: 8.33A
By the end, you should have a correctly sized heater in a safe location, a working thermostat, and a plan for checking temperatures and responding to cold nights. Heater choice depends on greenhouse size, insulation, local winter conditions, available power or fuel, and the plants you grow.
Difficulty: Intermediate | Time: 2-4 hours for planning and setup
What You’ll Need
Tools & Materials:
- Tape measure
- Outdoor thermometer or greenhouse thermometer with a minimum-temperature reading
- Thermostat or temperature controller rated for the heater, if the heater does not have a suitable built-in control
- Notebook or phone for recording dimensions and temperature readings
Knowledge:
- How to measure the length, width, and height of the greenhouse
- The minimum temperature your plants can tolerate
- How to read the heater’s installation and operating instructions
Check local rules and the heater manual before buying. For a fuel-burning heater, confirm that the model is approved for greenhouse use and that its venting and combustion-air requirements can be met. Have a qualified electrician review any new circuit or wiring work. Do not use an outdoor-rated extension cord as a permanent power supply.
Greenhouse Heater with Thermostat, Auto Power Control with Digital Temperature Display, Fast Heating, Overheat Protection, Electr…
The SmterCon’s digital thermostat and display give it the clearest advantage for maintaining a greenhouse temperature among these three. Its automatic on/off control can reduce the chore of switching the heater manually as conditions change. The other VEVOR models list heat and fan functions, but their supplied specifications do not describe comparable automatic thermostat cycling.SmterCon lists 1500W output and coverage of about 120 sq ft, a useful starting point for a modest growing area rather than a large greenhouse. Its adjustable temperature, wind speed and ventilation also make it more flexible than the compact VEVOR, which has only two speed settings. However, its listed 15A draw deserves attention: confirm the circuit and outlet can support the heater, and follow the manufacturer’s electrical and placement instructions. The product description mentions fire-proof construction and overheat protection, but these features do not remove the need to keep a heater safely clear of plants, water and combustible materials.We rank it first for control, not for universal greenhouse coverage. Compared with the angle-adjustable VEVOR, it offers more explicit temperature management but lacks a listed tilt angle in the supplied specs. Growers with a larger, leaky or colder structure should not assume this single unit can hold the desired temperature.
Pros:
- Digital temperature display and electronic thermostat
- Automatic on/off control around a set temperature
- Adjustable temperature, fan speed and ventilation
- Description states coverage of about 120 sq ft
Cons:
- Listed 15A draw may require careful circuit planning
- Stated coverage may not translate to a drafty or colder greenhouse
- No adjustable tilt angle is specified in the supplied details
Best for: Growers with a small greenhouse or grow tent who want a visible temperature setting and automatic thermostat cycling.
Not ideal for: Owners of larger or poorly insulated greenhouses, or anyone whose outlet and circuit cannot support the listed 15A draw.
Bottom line: Choose SmterCon when automatic temperature control matters more than precise tilt adjustment, after confirming the electrical circuit is suitable.
“Choose SmterCon when automatic temperature control matters more than precise tilt adjustment, after confirming the electrical circuit is suitable.”
Greenhouse Heater, 1500W Electric Space Heater with Thermostat, Fan & High Heat Modes, 25° Adjustable Angle, IPX4 & Overheat Prot…
This VEVOR is the more adaptable choice when we want to aim warm air across a particular section of a greenhouse. Its 25° adjustable angle is wider than the compact VEVOR’s stated 15° tilt, making it easier to redirect airflow toward a bench or away from a sensitive spot. It also combines heating with a fan mode, so the unit can circulate air without using its heat setting.The listed 40°F–108°F temperature range gives us a clearer sense of its thermostat span than the compact model’s maximum setting alone. However, the product details do not explain how accurately it senses temperature or whether it automatically cycles in the same way SmterCon does. For growers prioritizing set-point display and automatic operation, SmterCon remains the stronger fit. This VEVOR instead emphasizes straightforward heat, circulation and manual positioning.At 7.1 pounds, it is the heaviest of the three, despite having a portable handle. That matters if we need to move it often between a greenhouse, tent and indoor space; the 3.7-pound compact VEVOR is easier to carry. The product lists 1500W at 120V and 12.5A, so we should still plan for a suitable outlet and safe clearance. A timer and remote are not listed, limiting unattended scheduling compared with a heater built around automatic controls.
Pros:
- 25° adjustable angle for directing airflow
- Heating and fan modes for seasonal flexibility
- Listed temperature range of 40°F–108°F
- Portable handle and stable floor base
Cons:
- At 7.1 pounds, it is the heaviest option here
- No built-in timer or remote is listed
- Thermostat display and automatic cycling details are not specified
Best for: Growers who want to direct heat around a small greenhouse and also use a fan mode for air movement.
Not ideal for: Buyers who need a lightweight unit for frequent moves or want a documented digital display, remote or timer.
Bottom line: Pick this VEVOR when wider manual heat direction is more useful than SmterCon’s explicit digital thermostat controls.
“Pick this VEVOR when wider manual heat direction is more useful than SmterCon’s explicit digital thermostat controls.”
VEVOR Greenhouse Heater, 1500W Electric PTC Space Heater with Fan, Low & High Heat Modes, Adjustable Angle, Overheat Protection,…
At 3.7 pounds and roughly 8.27 x 6.3 x 8.66 inches, this VEVOR is the easiest of the three to shift between a grow tent, small greenhouse and other indoor spaces. That compact build gives it a clear role: it suits growers who want a movable heater without the heavier footprint of the 7.1-pound VEVOR. Its steel housing, stable base and handle support that portable use.It still lists 1500W output, plus low and high heat modes and a fan for circulation. Those basics cover simple spot warming, but control is less developed than SmterCon’s digital display and automatic thermostat. The stated 15° angle also gives less aiming range than the other VEVOR’s 25° adjustment. We should choose it for size and portability, not because it offers the most precise temperature management or broadest airflow positioning.The provided specifications list a 75°C maximum temperature setting, two speeds and indoor use. Fan noise may be noticeable in a quiet space, and two settings leave less room to fine-tune airflow. The listed 8.33A figure is lower than the other models’ supplied amperage figures, but we should verify the exact electrical requirements on the heater and its documentation before connecting it; do not infer circuit suitability from a comparison alone. No coverage area is supplied, so this is best treated as a compact-space option rather than a confirmed solution for a particular greenhouse size.
Pros:
- Lightest option at 3.7 pounds
- Compact dimensions suit tighter spaces
- 1500W output with low and high heat modes
- Fan mode supports air circulation
Cons:
- 15° tilt offers less aiming range than the other VEVOR
- Only two speed settings, with fan noise noted as a drawback
- No coverage area or digital thermostat display is specified
Best for: Growers with a small indoor growing area who need to move a heater frequently and value a compact footprint.
Not ideal for: Anyone needing a documented coverage area, digital thermostat display, broad tilt adjustment or quiet operation.
Bottom line: Choose the compact VEVOR for easy repositioning in a small growing space, while accepting simpler controls and less angle adjustment.
“Choose the compact VEVOR for easy repositioning in a small growing space, while accepting simpler controls and less angle adjustment.”
As an Amazon Associate we earn from qualifying purchases.
Before You Start
Choose a target temperature based on the plants at risk, not on the comfort temperature of a person. Different crops and growth stages can need different minimums. A heater protects plants only when it can deliver enough heat for the greenhouse’s heat loss on the coldest nights you plan to cover.
Read the heater label and manual for required clearances, mounting rules, power needs, ventilation, and permitted use. Keep heaters away from water, leaves, plastic film, pots, stored fuel, and anything that could fall onto them. Never use a combustion heater in a closed greenhouse unless the manufacturer specifies a properly vented installation. Carbon monoxide has no smell; use a suitable alarm where recommended and follow the fuel appliance instructions.
Step-by-Step Instructions
Step 1: Measure the greenhouse
Measure the inside length and width, then multiply them to find the floor area. Record the height, glazing or covering material, gaps, and any insulated walls. Note whether the greenhouse sits in a sheltered spot or is exposed to wind. These details affect heat loss; two greenhouses with the same floor area may need different heaters.
Tip: Check doors, vents, glazing joints, and the base for gaps. Repair loose panels and weather-strip doors before buying a larger heater, while keeping any required ventilation openings available.
Check: You have a written record of floor area, covering type, obvious air leaks, and exposure to wind.
Step 2: Set the minimum temperature
List the plants that must stay in the greenhouse and find their lowest safe temperatures from reliable growing guidance or plant labels. Use the most cold-sensitive plant as the initial target, or group plants by temperature needs and heat only the area that needs protection. Decide whether the heater must protect against frost, support active growth, or both.
Tip: Do not assume that a frost-free greenhouse is warm enough for tropical plants or seedlings. Their needs may be much higher than those of hardy crops.
Check: You have chosen a specific minimum temperature for the protected area and know which plants it applies to.
Step 3: Choose the heater type and capacity
Compare electric fan heaters, electric radiant heaters, and approved fuel-burning greenhouse heaters against your space and available utilities. Check each unit’s stated heat output, thermostat range, intended setting, and required clearance. Use the manufacturer’s sizing guidance or a reputable greenhouse heat-loss calculator that accounts for dimensions, covering, target temperature, and local design cold. Select capacity from that calculation rather than floor area alone.
Electric heaters avoid combustion fumes in the growing space, but the circuit must support the load. Fuel-burning models need the specified venting and fuel supply. Radiant heaters warm nearby surfaces and plants more directly, while fan heaters circulate warm air. Compare these features with the layout and the plants you are protecting.
Tip: If a heater’s rating is listed in watts, confirm the circuit’s voltage and current capacity. Do not plug multiple high-power appliances into one circuit without checking its rating.
Check: The selected model is approved for the location, can meet the calculated heat demand, and has a compatible power or fuel supply.
Step 4: Prepare the site and power supply
Clear the planned heater area of dry leaves, packaging, tools, fabric, and flammable liquids. Place the unit on a stable, level surface or mount it exactly as the manual directs. Keep the stated clearance from plants, benches, greenhouse film, water lines, and walkways. Route the power cable where it cannot be stepped on, pinched by a door, or splashed.
Use a grounded, appropriately rated outlet and any required residual-current protection. Do not modify plugs, bypass safety switches, or run a cable through standing water. If the existing circuit, outlet, or wiring condition is uncertain, ask a qualified electrician to check it before connecting the heater.
Tip: Greenhouse humidity and condensation can affect electrical equipment. Follow the unit’s moisture rating and keep electrical connections out of damp areas.
Check: The heater is stable, its clearances match the manual, and the supply is suitable for its electrical load or fuel requirements.
Step 5: Position the thermostat and thermometer
Place the thermostat sensor at plant height in the area you need to protect. Keep it out of the heater’s direct airflow or radiant beam, away from a cold exterior wall, and out of direct sun. Put a separate thermometer nearby so you can compare readings. Avoid placing either sensor where watering will wet it.
Tip: A sensor next to the heater may register a warm pocket and switch the unit off before the rest of the greenhouse has warmed.
Check: The controller and thermometer are near the plants being protected and report plausible, similar temperatures when the heater is off.
Step 6: Set the controls and test the heater
Set the thermostat to the minimum temperature selected for your plants, then follow the manual to start the heater. Check that the thermostat calls for heat when the greenhouse is below the setting and stops the heater after the air warms. Observe the unit during its first operating period. Check for unusual smells, smoke, sparks, excessive vibration, hot cables, or a safety switch that trips.
For a fuel-burning unit, follow the ignition and ventilation steps exactly. Check the vent and combustion-air path as directed by the manufacturer. Stop use and follow the manual’s fault instructions if the flame is unstable, fumes enter the greenhouse, or an alarm sounds.
Tip: Do not leave a newly installed heater running unattended until you have observed a complete heating and shutoff cycle.
Check: The heater starts and stops under thermostat control, and no warning sign or abnormal operation appears.
Step 7: Check temperature distribution
After the heater has run, measure the temperature at several plant locations, including the farthest corner and the area nearest the door. Compare those readings with the thermostat. Adjust the heater direction only within the manual’s placement rules. If warm air is uneven, improve circulation with a suitable greenhouse fan placed safely away from water and heater clearances.
Tip: A fan should mix air without blowing directly onto delicate plants or disturbing the heater’s thermostat reading.
Check: The protected plants remain above their chosen minimum, and readings across the growing area are close enough for the plants’ needs.
Step 8: Monitor cold-weather operation
Record the overnight low, thermostat setting, and heater behavior during several cold nights. Check the greenhouse early in the morning and after unusually windy or cold weather. If temperatures fall below target, first inspect the sensor position, doors, vents, and heater operation. Add insulation or reduce the heated area where practical before increasing heater output.
Keep the heater and surrounding area clear during use. Follow the manual’s cleaning and maintenance schedule, and disconnect power before cleaning when instructed. For fuel models, arrange the required inspection and servicing on the manufacturer’s schedule.
Tip: A power failure can defeat an electric heater. For valuable or cold-sensitive plants, consider a temperature alarm or backup plan that does not overload the main circuit.
Check: Your temperature log shows the protected area stayed within its target range during the conditions you intended the heater to handle.
Common Mistakes to Avoid
- Choosing a heater by floor area alone. — Use dimensions, covering, air leaks, target temperature, and local cold conditions in the sizing calculation.
- Placing the thermostat beside the heater or in direct sun. — Position its sensor at plant height in a representative spot, away from direct heat and sunlight.
- Using a household heater or extension cord in a damp greenhouse without checking its rating. — Use equipment approved for the location and follow electrical load, grounding, and moisture instructions.
- Blocking required ventilation around a fuel-burning heater. — Follow the specified venting and combustion-air requirements, and stop using the unit if fumes or an alarm occur.
Troubleshooting
Problem: The greenhouse stays below the thermostat setting.
Solution: Confirm the setpoint and sensor reading, then check that doors and glazing are closed and that the heater is operating. Review its output against the heat-loss estimate. If it is undersized or the greenhouse leaks heat, reduce heat loss or use a correctly rated unit.
Problem: The heater switches off while distant plants are still cold.
Solution: Move the sensor away from direct heat and toward the plant area that needs protection. Check temperature at multiple points and improve air mixing with a safely placed fan if the manual allows.
Problem: A breaker or safety switch trips.
Solution: Turn off and unplug the heater if safe to do so. Do not repeatedly reset the breaker or use a different outlet as a workaround. Have an electrician check the circuit and appliance load.
Problem: A fuel heater produces fumes, an unstable flame, or a carbon monoxide alarm.
Solution: Leave the greenhouse, get fresh air, and follow emergency guidance for the alarm and appliance. Do not restart the heater until it has been inspected and the venting problem has been corrected.
What Success Looks Like
The heater is installed according to its manual, has the required clearance and suitable power or fuel supply, and responds to the thermostat. A separate thermometer confirms that plants remain above their selected minimum during the cold conditions the setup is intended to handle. Electrical or fuel safety warnings are absent, and your temperature log shows consistent overnight performance.
Next Steps
Keep the temperature log and review it after cold snaps, changes to the greenhouse covering, or rearrangement of plants and benches. Clean and inspect the heater on the schedule in its manual. Recheck clearances as plants grow, and test any alarm or backup plan before the next cold season. Get a qualified electrician or fuel-appliance technician to investigate repeated shutdowns, damaged wiring, abnormal flame behavior, or uncertain venting.
Frequently Asked Questions
What temperature should I set a greenhouse heater to?
Set it to the lowest temperature that protects the plants in the heated area. Check requirements for each crop and growth stage; seedlings and tropical plants may need warmer conditions than hardy greens.
Can I use a regular space heater in a greenhouse?
Only if the heater’s label and manual permit the location and its moisture, clearance, and electrical requirements can be met. Many household heaters are not made for humid greenhouse conditions.
Should I leave a greenhouse heater on overnight?
A thermostat-controlled heater can run overnight if its manual permits that use, the installation is safe, and the unit can maintain the target temperature. Observe its operation first and use a suitable temperature alarm for sensitive plants.
How can I reduce heating costs?
Seal unintended gaps, maintain the greenhouse covering, use insulation that does not block required light or ventilation, and heat only the area that needs protection. A lower setpoint within the plants’ safe range can also reduce heat demand.
Do fuel-burning greenhouse heaters need ventilation?
Follow the exact venting and combustion-air instructions for the model. Do not run an unvented fuel heater in a closed greenhouse unless its manufacturer explicitly approves that use and specifies the required installation.