
TL;DR
Moving your rig into a closet can cut noise and improve acoustics—if you ventilate properly. The key is strategic placement, targeted treatment, and understanding the difference between soundproofing and absorbing. Proper airflow is essential for a safe, quiet setup(learn more about system setup and optimization).
Ever thought about hiding your noisy rig in a closet? It’s a surprisingly smart move. Not only does it keep your workspace quiet, but it also transforms a small space into a mini studio with the right setup. But it’s not just about shoving everything in a corner. The secret lies in smart placement, treatment, and airflow(see acoustic dampening tips).
In this guide, you’ll learn how to make the most of your closet for sound, keep your gear cool, and avoid common pitfalls. Whether you’re recording vocals or just trying to silence your GPU, these tips will help you turn a tiny space into a powerhouse of performance and silence.
Acoustic dampening
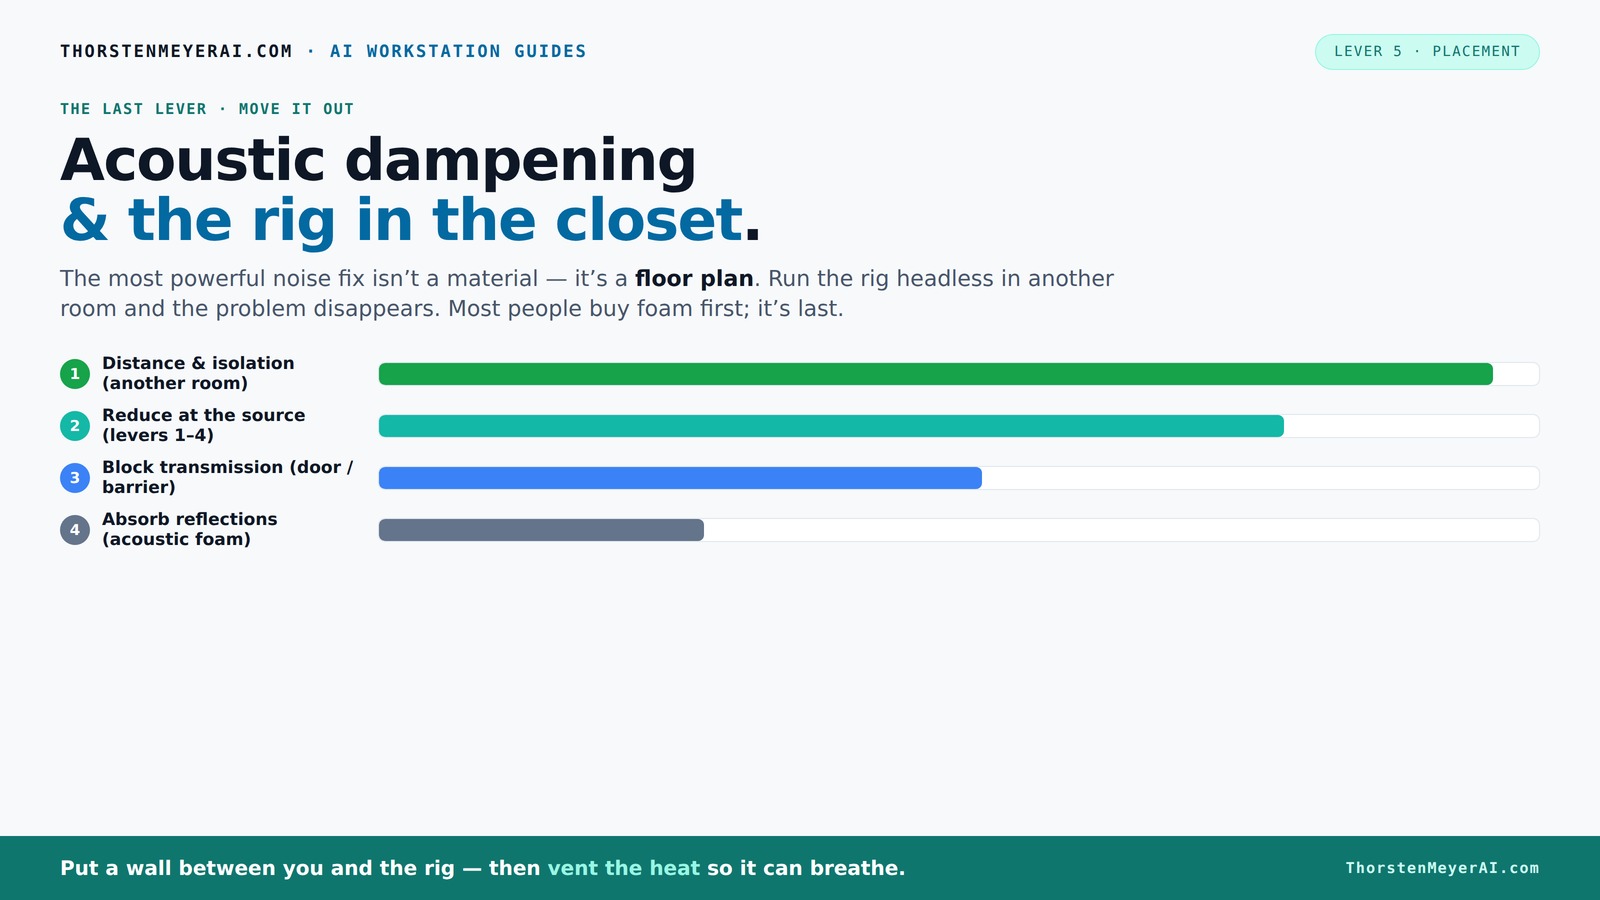
& the rig in the closet.
The most powerful noise fix isn’t a material — it’s a floor plan. A rig you can’t hear because it’s in another room beats any amount of foam. Tap the approaches in Part 1 to see what actually works.
(another room)
(levers 1–4)
(door / barrier)
(acoustic foam)
Contain the noise, not the heat
Key Takeaways
- Moving your rig into a closet or separate room is the most effective way to reduce noise.
- Proper ventilation is critical — a sealed closet traps heat, risking hardware damage.
- Treat first reflection points and corners with absorption and bass traps for clearer recordings.
- Seal gaps around doors and vents to prevent sound leaks.
- Use targeted placement instead of just adding foam for the best acoustic results.

Focusound 52 Pack Acoustic Foam Panels 1" x 12" x 12" Sound Proof Foam Panles Soundproofing Noise Cancelling Wedge Panels for Home Office Recoding Studio with 300PCS Double-Side Adhesive
- Soundproofing Design: Triangular grooves for noise absorption
- Includes Adhesive Tape: 300pcs double-sided adhesive for easy installation
- Easy Shape Recovery: Reverts to shape after soaking in water
As an affiliate, we earn on qualifying purchases.
As an affiliate, we earn on qualifying purchases.
Why Moving Your Rig Is the Easiest Way to Cut Noise (And How It Works)
Moving your AI rig into a different room — like a closet — is the most effective noise solution. It’s like turning down the volume at the source. When your rig is far away, the sound waves have a longer distance to travel, losing energy along the way. This simple step can cut noise levels by over 80%.
For example, I set up a high-powered GPU in a closet on the other side of my apartment. The noise dropped so dramatically I barely noticed it while recording vocals in the next room. The big takeaway: your best soundproofing move is to put space between you and the machine.
The 'Rig in the Closet' Setup: Ventilation Is the Key to Safety and Performance
Placing a hot, noisy rig in a closet works great—if you give it enough air. Without proper ventilation, heat builds up fast. A GPU running at 600W can turn a closet into an oven(find out more about hardware cooling). Trapped heat throttles your hardware and forces the fans into overdrive.
Key move: install a quiet exhaust fan or passive vents. For example, a simple ducted fan can keep the temperature stable while reducing noise. Serious setups use purpose-built soundproof cabinets with temperature-controlled airflow, blending silence with heat dissipation. Learn more about this at this guide.
Acoustic Dampening in a Closet: Absorb, Block, and Isolate Like a Pro
Acoustic dampening isn't just about foam panels; it’s a comprehensive process that significantly impacts your recording quality and noise reduction. Absorbing reflections is crucial because sound waves bouncing chaotically inside the space create reverberations that muddy your recordings and amplify noise. Blocking sound leaks is equally important: without it, external noise can intrude, reducing clarity and creating distractions. Isolating vibrations minimizes the transfer of mechanical noise from your equipment to the environment, which is especially noticeable in small, enclosed spaces where vibrations can easily transfer through surfaces. These steps are interconnected: effective absorption reduces reverb, blocking prevents sound escape, and isolation prevents external noise from entering. Neglecting any of these can result in residual echo, unwanted sound leakage, or vibration noise, undermining your setup’s effectiveness. Prioritizing all three creates a balanced, professional-quality acoustic environment, even in tight spaces, ensuring your recordings are clean, clear, and free of distracting noise(see acoustic treatment strategies).
Placement Tips: Where to Put Panels for the Best Sound in a Closet
Placement is everything. In a closet, focus on first reflection points: directly behind and beside the mic, as well as the wall behind you. Use a mirror to find these points: have a friend hold it while you sit, and mark where sound bounces first.
Cover side walls, ceiling, and the door for balanced absorption. Bass traps should go in corners to prevent low-end muddiness. Don’t forget the floor—rugs or thick blankets help minimize slap echoes and bass reinforcement.
Strategic placement maximizes absorption, reducing echo and making your recordings sound clearer. Proper placement ensures that sound waves are absorbed before they bounce multiple times, which can cause muddiness and echo. When absorption is targeted at reflection points, it prevents the buildup of standing waves and flutter echoes, leading to a more accurate and natural sound. In small spaces, this precise positioning is crucial because every reflection can significantly distort your recording. Check out this guide for more tips(explore more on acoustic setup).
How to Treat a Closet Door, Floor, and Ceiling for Better Sound
The closet door is a major sound leak point. Hang a thick blanket or a weighted quilt over it to reduce airborne sound passing through. For the floor, a large rug or carpet absorbs reflections and prevents sound from bouncing underneath.
The ceiling can reflect sound back down. In small spaces, adding a foam panel or acoustic tile overhead can tame high-frequency reflections. The goal: create a balanced environment where sound doesn’t bounce chaotically, which helps maintain clarity in recordings and reduces noise leakage.
For more on sealing gaps and treatment options, see this article.
Controlling Bass Buildup: Why It Matters and How to Do It
Low frequencies tend to gather in the corners of your closet, creating a muddy, boomy sound that can ruin your recordings and make mixing a nightmare. Bass buildup occurs because low-end energy naturally resonates and accumulates in these spaces, leading to an unbalanced sound that emphasizes muddiness over clarity. Bass traps or foam panels placed in the corners help absorb these deep tones, preventing them from resonating and causing muddiness. Without proper treatment, these low-end frequencies can dominate your mix, making it sound imbalanced and less professional. Addressing this issue with dedicated traps or thick acoustic panels ensures your recordings have clarity and punch, especially in the low end. Think of it as giving your sound a clean foundation—without it, everything else can sound off. Effective bass management ultimately leads to more accurate, tight recordings that translate well across systems, making mixing and mastering more straightforward and producing a more polished final product.
How to Keep Your Rig Cool and Quiet in a Closet
Heat is your enemy when placing a rig in a closet. Use a combination of active ventilation and strategic airflow. An exhaust fan pulling hot air out, paired with intake vents, keeps temperatures safe and noise low. Proper airflow prevents the buildup of heat, which can cause thermal throttling, reduce hardware lifespan, and increase fan noise as the system struggles to cool itself.
Consider a liquid cooling system with a radiator outside the closet, which exports heat effectively. This setup not only keeps temperatures stable but also minimizes the noise generated by fans working hard to cool hot components, resulting in a quieter environment overall. For detailed options and setup tips, check this comparison.
Common Mistakes to Avoid When Setting Up a Closet Rig
One big mistake: sealing the closet completely without ventilation. It’s like putting your PC in a plastic bag — it’ll overheat fast. Proper airflow is essential to prevent thermal issues that can damage your hardware or cause noise from fans working overtime. Also, relying solely on foam panels to solve all sound issues is a mistake. Without proper placement and treatment of reflection points and bass buildup, sound quality and noise control suffer. Gaps around doors or vents are often overlooked but can be significant sound leaks, undermining your efforts. Lastly, underestimating the importance of correct mic placement and targeted acoustic treatment can make your recordings muddy or inconsistent. Effective setup requires a balanced approach—good airflow, strategic treatment, and proper positioning—to truly silence and optimize your closet rig.
Frequently Asked Questions
Is a closet actually good for recording vocals or voiceover?
Yes, small closets can be ideal for vocals because their size makes acoustic treatment more effective. However, you must treat reflections, bass buildup, and ensure proper ventilation to prevent echo and overheating.What is the difference between soundproofing and acoustic treatment?
Soundproofing blocks sound from entering or leaving a space, often with mass, sealing, and barriers. Acoustic treatment reduces reflections, echoes, and reverb inside a room, making recordings clearer without necessarily stopping sound from escaping.Where should I place acoustic panels in a closet booth?
Place panels at the first reflection points—usually behind and beside the mic—along with bass traps in corners. Cover the ceiling and door with absorption material for balanced sound control.Do I need bass traps in a closet?
If your recordings sound boomy or muddy, especially in the low end, bass traps in corners will help tighten the sound and reduce low-frequency buildup.How much treatment is enough for a small booth?
Two-inch panels on the walls, bass traps in corners, and treatment at first reflection points generally suffice. Larger or more reflective spaces may need thicker panels or broader coverage.Conclusion
Placing a noisy rig in a closet isn’t just about hiding the sound — it’s about smart placement and treatment. Ventilation keeps your hardware safe, while strategic absorption makes your recordings crisp and clear. Think of your closet as a tiny, dedicated studio, not a catchall.
Remember, the best solution combines space, airflow, and targeted acoustic treatment. When done right, your closet rig can be a silent, powerful workhorse that never distracts or distorts your work.